

Although Windows 11 includes multiple tools for customizing the system, such as the Settings app, Control Panel, and Group Policy Editor, advanced users often turn to the Registry Editor for deeper, more granular control over the operating system.
Over time, I’ve found that I routinely make at least six Registry tweaks to streamline the experience across my devices. These changes go beyond cosmetic adjustments, as they help me improve the overall experience.
For instance, I regularly turn off the « Home » page in the Settings app to avoid unnecessary clutter. I also pause Windows Update and choose to install patches manually only when it fits into my workflow. The Lock Screen, while visually appealing, often feels like an extra click I don’t need, so I remove it entirely.
You may like
One tweak I never skip is turning off web results in Windows Search, especially on systems where I want only to focus on local search results. Completing this configuration requires applying a specific Registry value to turn off the integration with Bing.
In this how-to guide, I’ll outline the top Registry tweaks I consider that every power user should apply to Windows 11.
Warning: This is a friendly reminder that editing the Registry is risky and can cause irreversible damage to your installation if you don’t do it correctly. Before proceeding, it’s recommended that you make a full backup of your PC.
Registry tweaks you should use on Windows 11
The following Registry mods to apply on Windows 11 are not listed in any particular order.
1. Disable the Home page in Settings
Originally, the Settings app opened directly into the « System » section. However, the development team then had the idea to include a « Home » page, which, while it might be helpful to access your frequent and recommended settings, is another place where the company places recommendations to promote different products.
Although the operating system doesn’t have the option to customize this page, the alternative is to turn off the experience and revert to the « System » page by default.
To turn off the Settings’ Home page on Windows 11, use these steps:
Open Start.Search for regedit and click the top result to open the Registry Editor.Open the following location: HKEY_LOCAL_MACHINE\SOFTWARE\Microsoft\Windows\CurrentVersion\Policies\ExplorerRight-click the Explorer key, select New, and choose the String Value option.Confirm the SettingsPageVisibility for the string and press Enter.
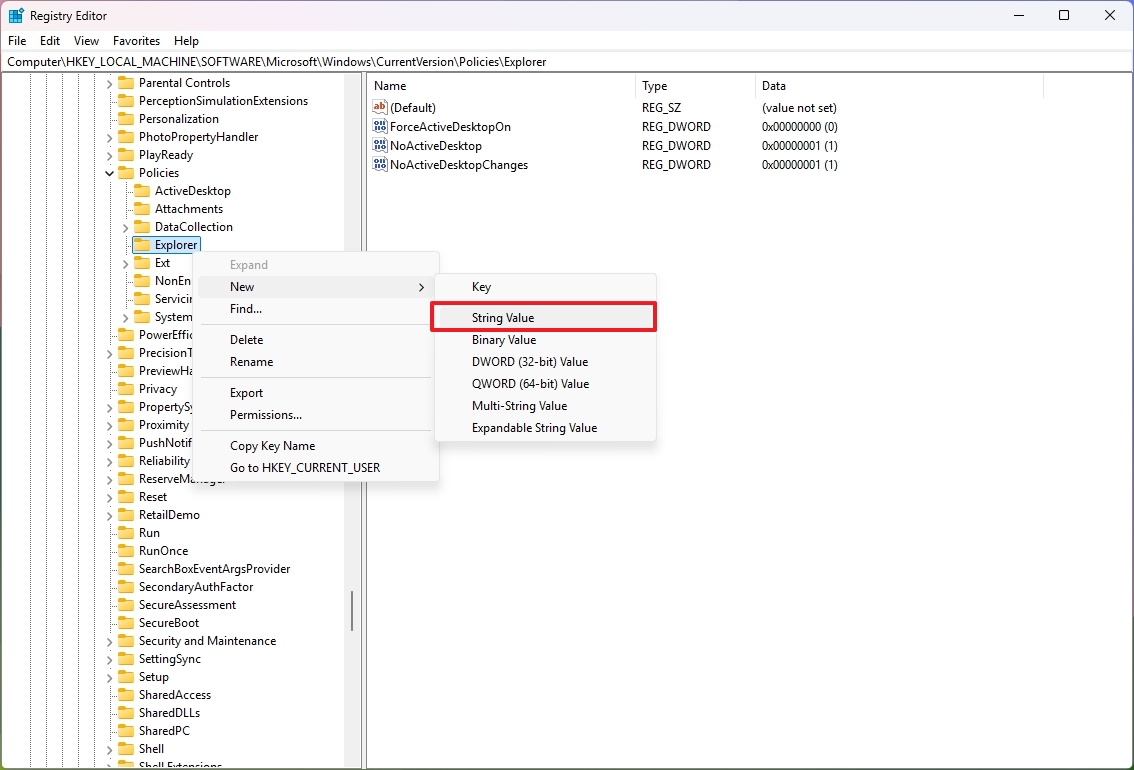
Right-click the newly created string and choose the Modify optionChange the string value to hide:home.
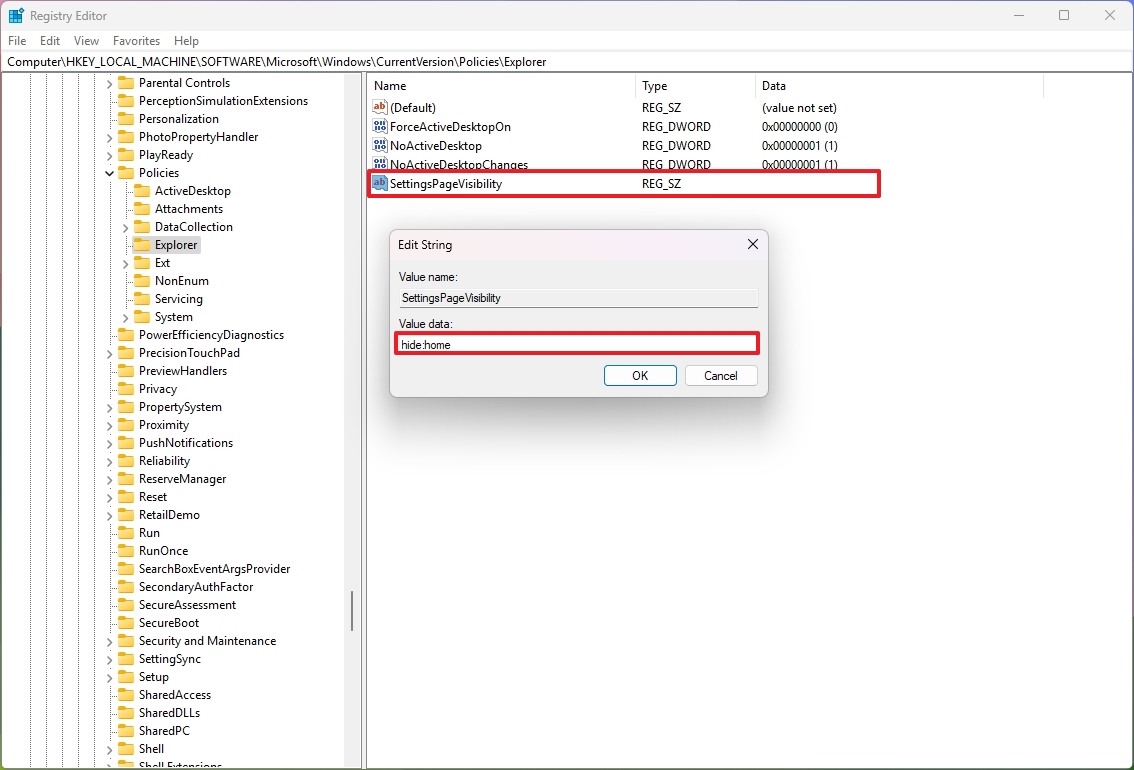
Click the OK button.Restart the device.
Once you complete the steps, the next time you open the Settings app, the « Home » page won’t be available, and you’ll be directed to the « Settings » page.
If you want to restore the page, you can use the same instructions, but on step 4, right-click the « SettingsPageVisibility » string, choose the « Delete » option, and restart your device.
You can also use the Registry or Group Policy to remove virtually every page in the Settings app.
2. Disable automatic Windows Update
One of the most controversial features of Windows 11 is the update system since even though updates are important for patching vulnerabilities, improving overall performance, and access to new features, they’re also known to cause problems.
Although the operating system makes it virtually impossible to disable the update system, you can modify the Registry to prevent the system from downloading and installing updates automatically.
However, using this approach, you can still check and download updates from the « Windows Update » settings.
To disable Windows Update on Windows 11, use these steps:
Open Start.Search for regedit and click the top result to launch the Registry Editor.Open the following location: HKEY_LOCAL_MACHINE\SOFTWARE\Policies\Microsoft\WindowsRight-click the Windows (folder) key, select New, and choose the Key option.Name the key WindowsUpdate and press Enter.Right-click the newly created key, select New, and choose the Key option.Name the key AU and press Enter.Right-click the AU key, select New, and choose the « DWORD (32-bit) Value » option.
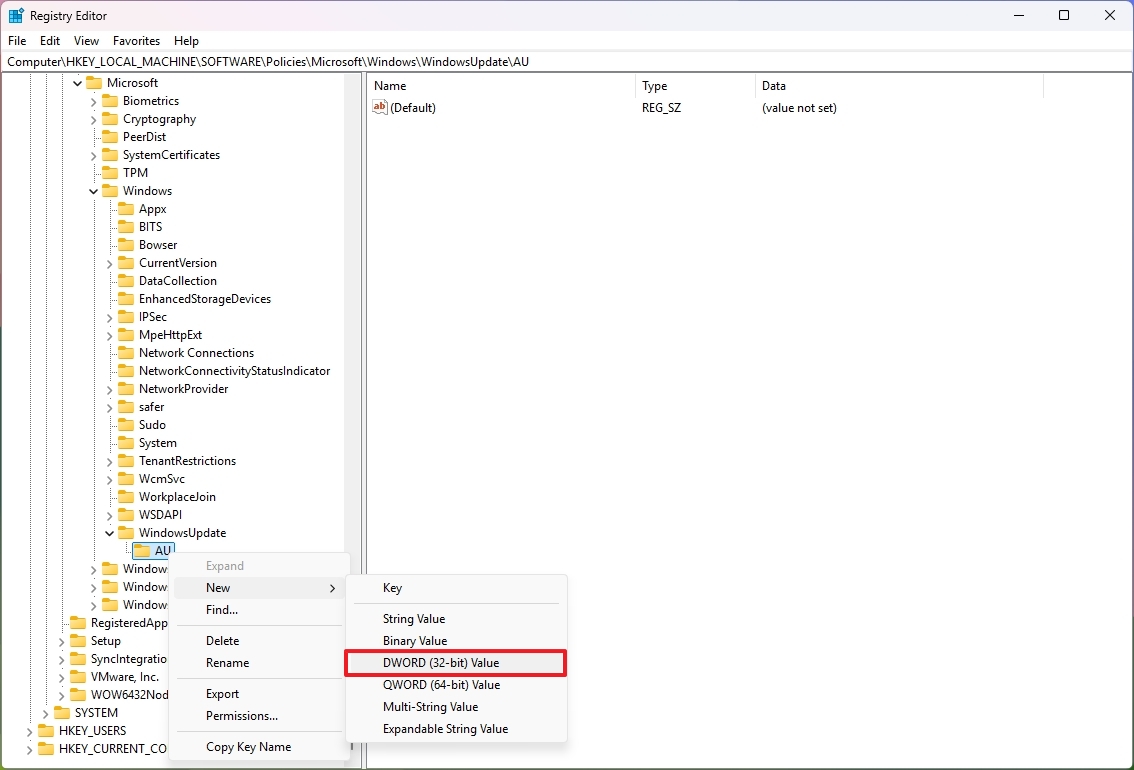
Name the new key NoAutoUpdate and press Enter.Right-click the newly created key and choose the Modify option.Change its value from 0 to 1.
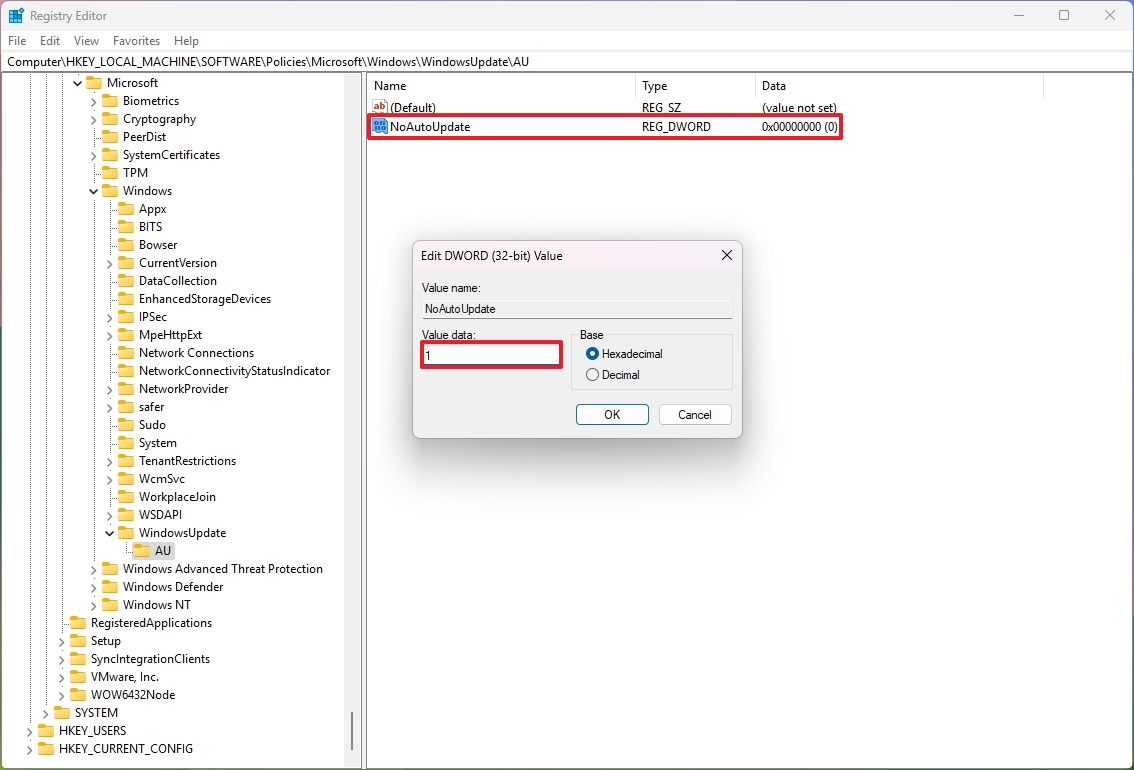
Click the OK button.Restart the device.
After you complete the steps, the computer will no longer download and install updates automatically. However, whenever you’re ready, you can update your device by clicking the « Check for updates » button from the « Windows Update » page.
If you want to undo the changes, you can use the same instructions, but on step 4, right-click the WindowsUpdate key, select the « Delete » option, and restart the device.
3. Disable the Lock Screen experience
On Windows 11, the Lock Screen is the first experience that appears when you power on the device, before the Sign-in screen.
If you want to speed up the sign-in process, you can turn off the Lock Screen experience using multiple methods, including the Registry.
To disable the Lock Screen on Windows 11 through the Registry, use these steps:
Open Start.Search for regedit, and select the top result to open the Registry.Open the following location: HKEY_LOCAL_MACHINE\SOFTWARE\Policies\Microsoft\WindowsRight-click the Windows key (folder), select the New submenu, and choose the Key option.Name the key Personalization and press Enter.Right-click the Personalization folder, select the New submenu, and choose the « DWORD (32-bit) Value » option.
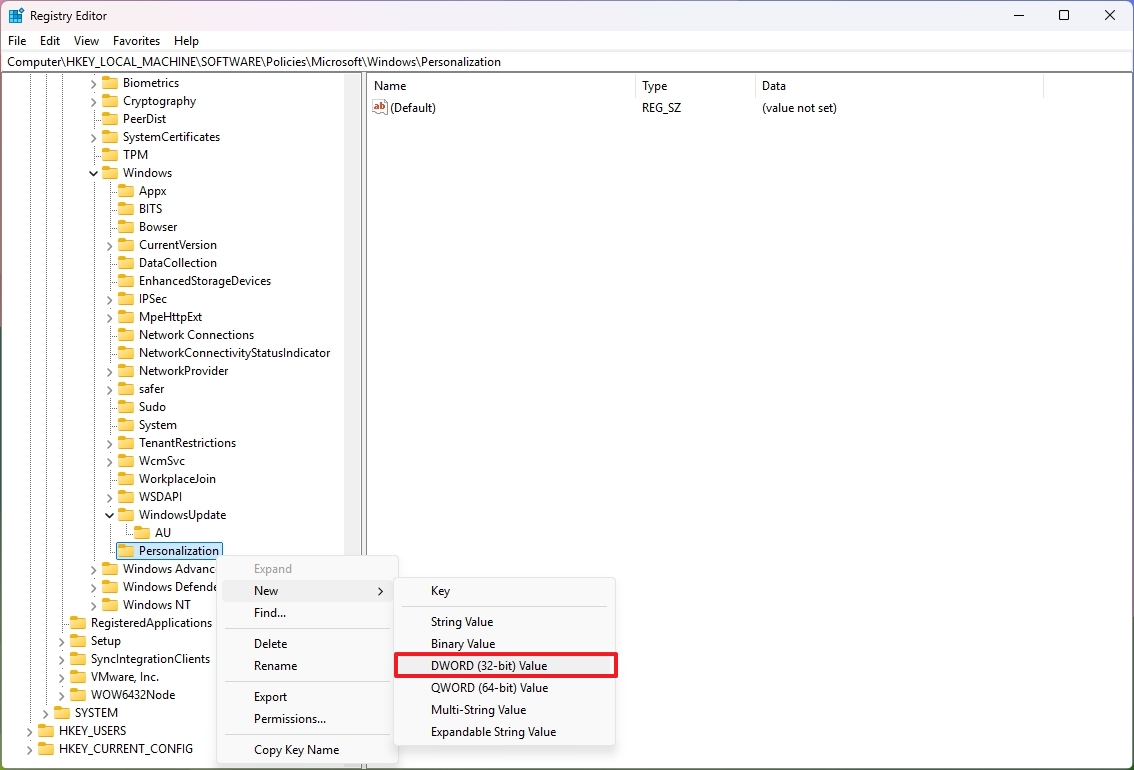
Name the key Nolockscreen and press Enter.Right-click the « Nolockscreen » key and select the Modify option.Change the value data from 0 to 1.
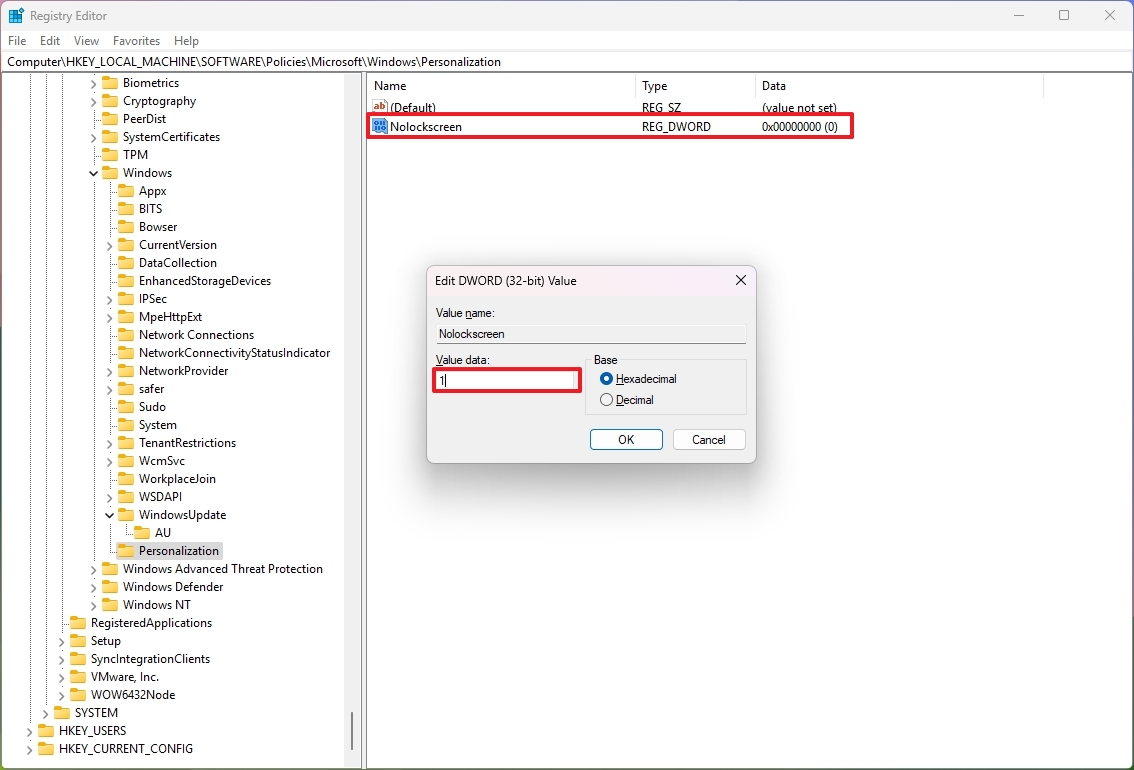
Click the OK button.Restart the device.
Once you complete the steps, the next time you boot your computer, it’ll load directly into the Sign-in Screen.
If you want to re-enable the changes, follow the same instructions outlined above, but in step 8, set the « Nolockscreen » value to 0 or delete the Registry key.
When performing a search on Windows 11 through the Taskbar, in addition to the results for apps, settings, and documents, the Windows Search experience also includes related web results.
If you prefer only to get local results, the operating system doesn’t include an option to turn off this feature, but you can disable it from the Registry.
To disable the Bing search results from the Windows Search experience, use these steps:
Open Start.Search for regedit and click the top result to open the Registry Editor.Open the following location: HKEY_CURRENT_USER\SOFTWARE\Policies\Microsoft\WindowsRight-click the Windows key, select the New menu, and choose the Key option.Name the key Explorer and press Enter.Right-click the newly created key, select the New menu, and choose the « DWORD (32-bit) Value » option.
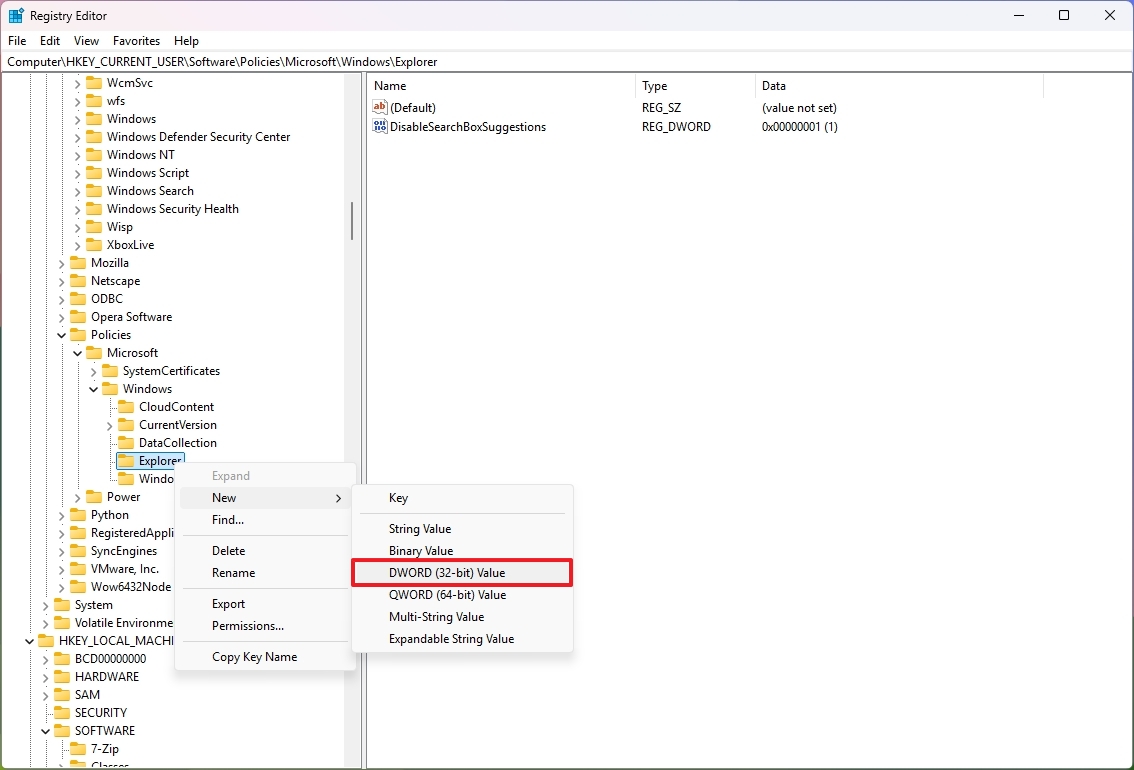
Name the DWORD DisableSearchBoxSuggestions and press Enter.Right-click the newly created key and choose the Modify option.Change its value from 0 to 1.
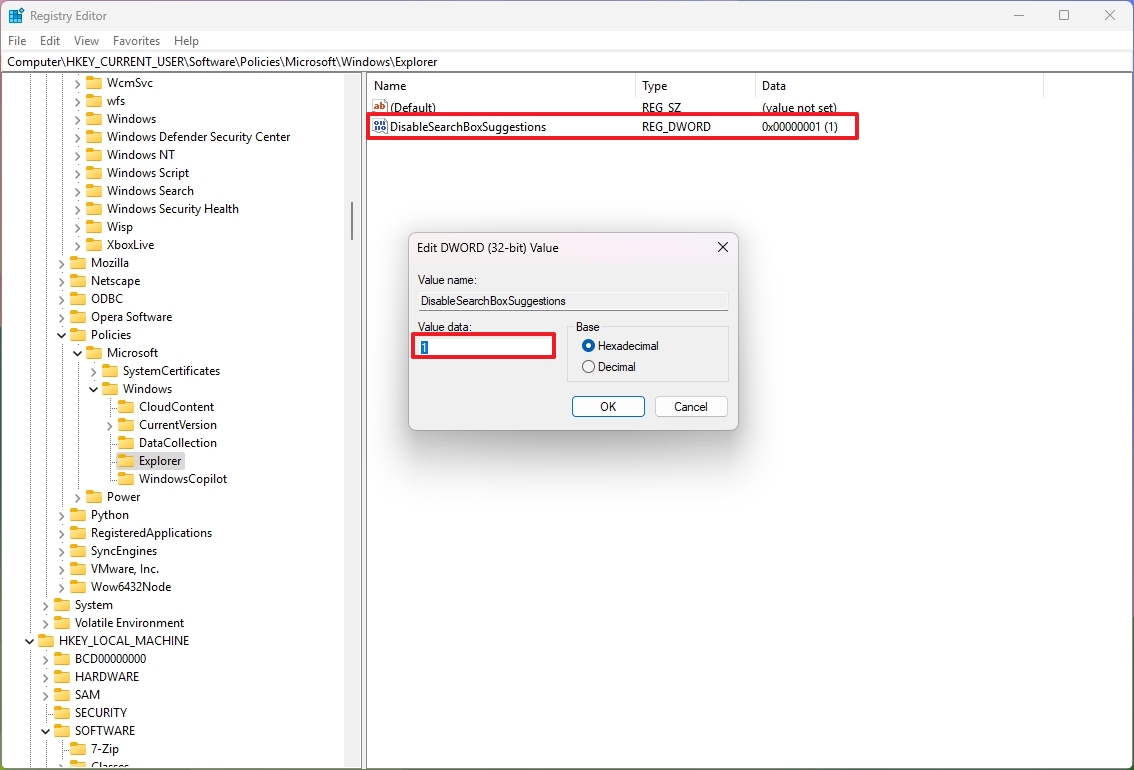
Click the OK button.Restart the device.
After you complete the steps, the Windows Search experience will only show results from apps, settings, and files.
If you want to revert the changes, you can use the same instructions outlined above, but on step 6 (inside the Explorer key), right-click the « DisableSearchBoxSuggestions » DWORD and select the « Delete » option.
Windows 11 features a redesigned context menu, but the issue is that the menu reduces the number of options. You can still access the legacy menu, but additional steps are required.
If you prefer the classic (more cluttered) context menu, you can turn off the modern design and make the legacy design the new default through the Registry.
To enable the classic context menu on Windows 11, use these steps:
Open Start.Search for regedit and click the top result to open the Registry.Open the following location: HKEY_CURRENT_USER\SOFTWARE\CLASSES\CLSIDRight-click the CLSID key, select the New menu, and select the Key option.
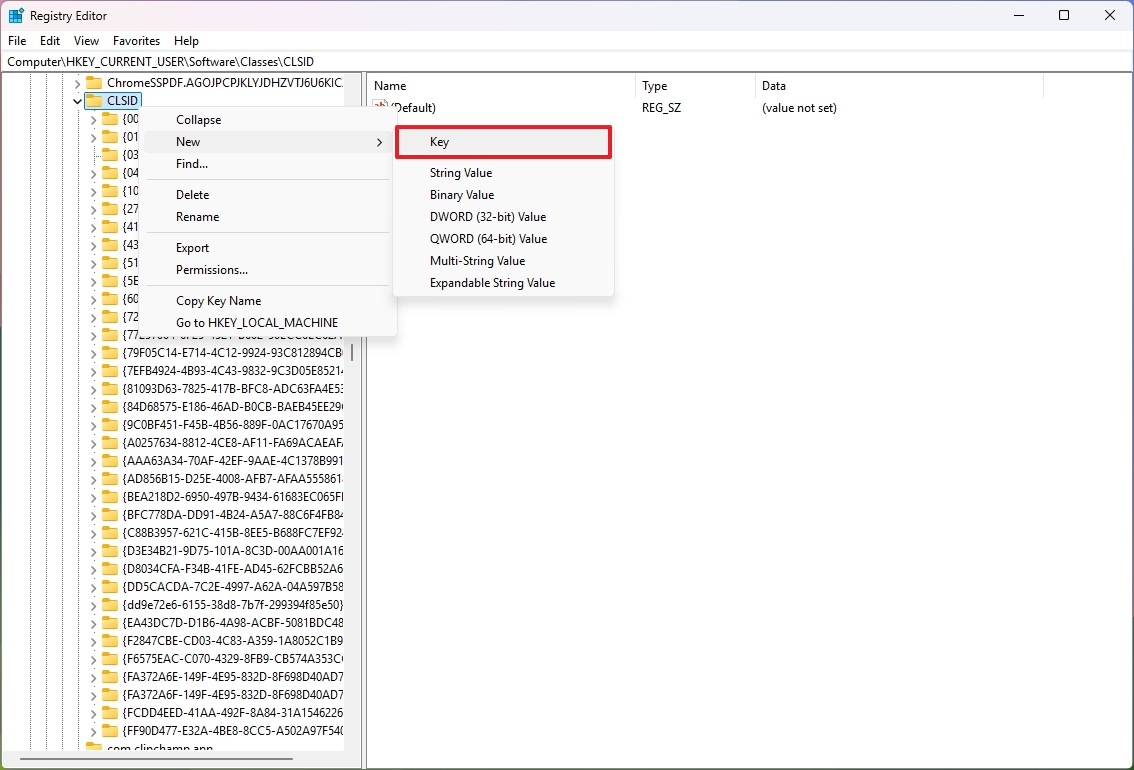
Name the key {86ca1aa0-34aa-4e8b-a509-50c905bae2a2} and press Enter.Right-click the newly created key, select the New menu, and select the Key option.Name the key InprocServer32 and press Enter.Right-click the default string key and choose the Modify option.Set its value to nothing (blank).
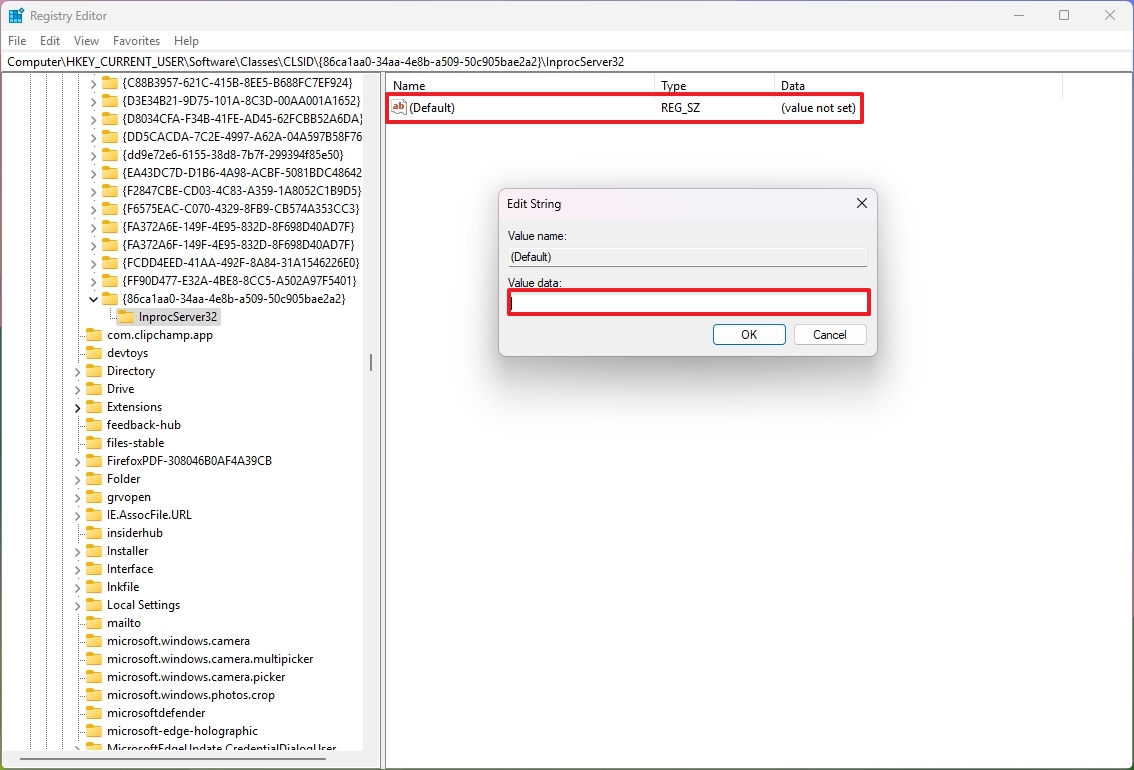
Click the OK button.Restart the device.
Once you complete the steps, the next time you right-click an item in File Explorer, you will have the legacy context menu with all the supported items.
If you want to re-enable the modern context menu, you can use the same instructions outlined above, but on step 4, right-click the {86ca1aa0-34aa-4e8b-a509-50c905bae2a2} key and choose the « Delete » option.
Microsoft completely redesigned the classic context menu, which had become overwhelmed with decades of commands and extensions. The new « modern » menu uses a clean, ribbon-style layout to surface only the most relevant actions, such as Cut, Copy, Paste, Rename, and Delete, delivering a sleek, efficient experience that aligns with the Windows 11 style.
Yet compatibility remains a priority, and as a result, the operating system still offers the full legacy menu through the « Show more options » or « Shift + F10 » keyboard shortcut, ensuring users retain access to every command, including those from third-party apps that haven’t updated to the new context menu API.
The irony is that the new menu continues to grow in the number of options, so it’s just a matter of time before this latest design becomes too cluttered again.
6. Enable automatic Registry backup
Until Windows 11 version 1803, the system automatically created a backup of the Registry every time the computer started up correctly in the « RegBack » folder. However, the functionality was then removed to minimize the setup’s storage usage.
Although not many people were aware of this feature, it was a great way to recover the system after a buggy update or make system changes that prevented the operating system from booting correctly. However, it’s possible to restore this functionality using the Registry.
To enable automatic Registry backups on Windows 11, use these steps:
Open Start.Search for regedit and click the top result to open the Registry.Open the following location: HKLM\System\CurrentControlSet\Control\Session Manager\Configuration ManagerRight-click the Configuration Manager key, select New, and click the « DWORD (32-bit) Value » option.
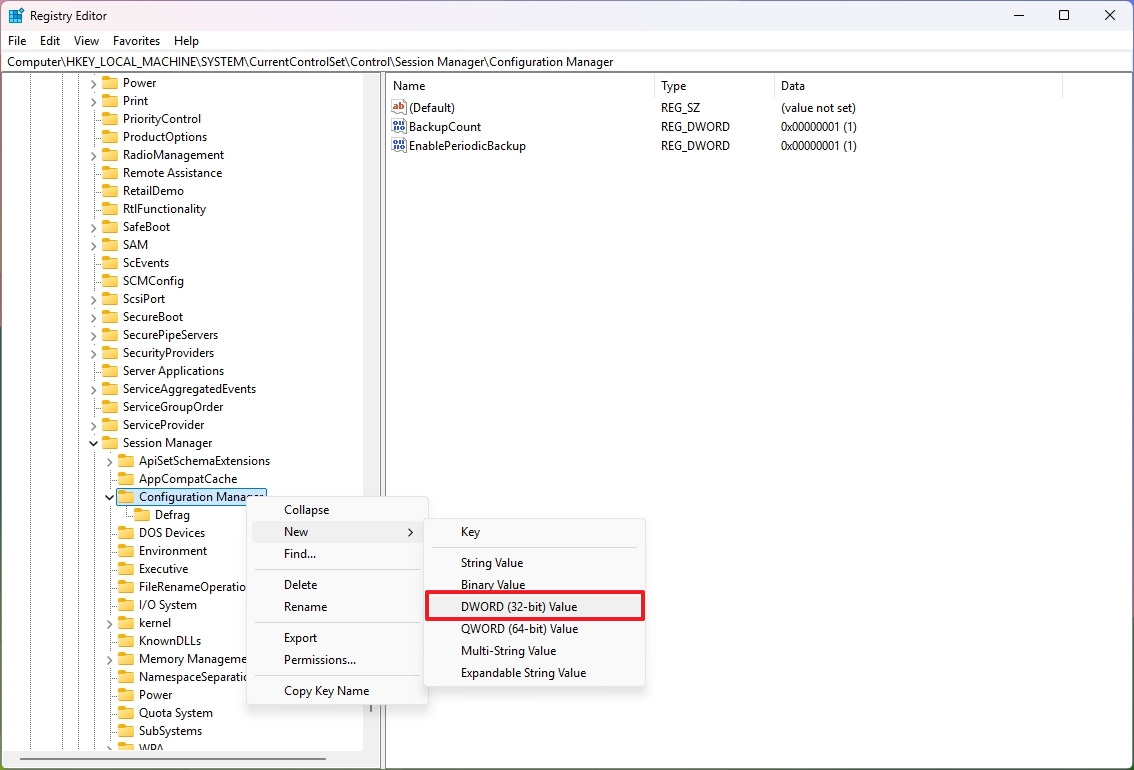
Confirm the key EnablePeriodicBackup name and press Enter.Right-click the newly created key and choose the Modify option.Set the value from 0 to 1.
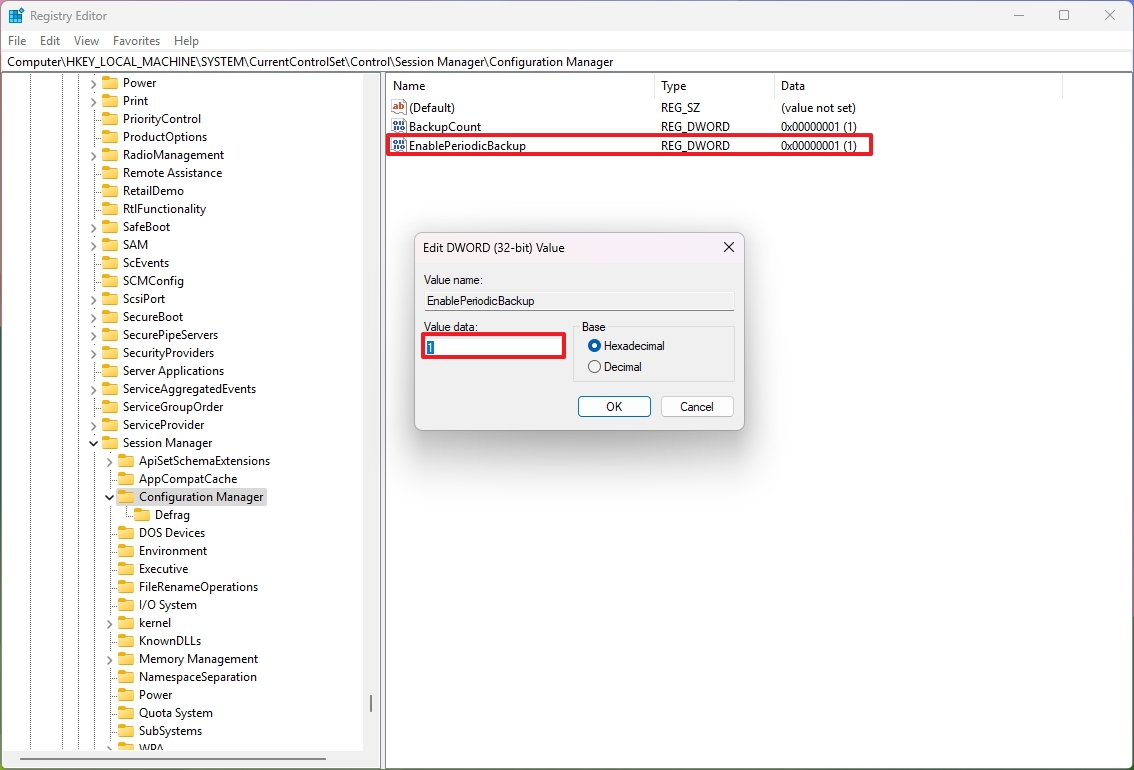
Click the OK button.Open Start.Search for Command Prompt, right-click the top result, and choose the Run as administrator option.Type the following command to create a task that will run the backup and press Enter: schtasks /Create /TN « \MyTasks\MyRegistryBackup » /TR « schtasks /run /i /tn \ »\Microsoft\Windows\Registry\RegIdleBackup\ » » /SC DAILY /ST 12:00 /RU « SYSTEM » /RL HIGHEST /F
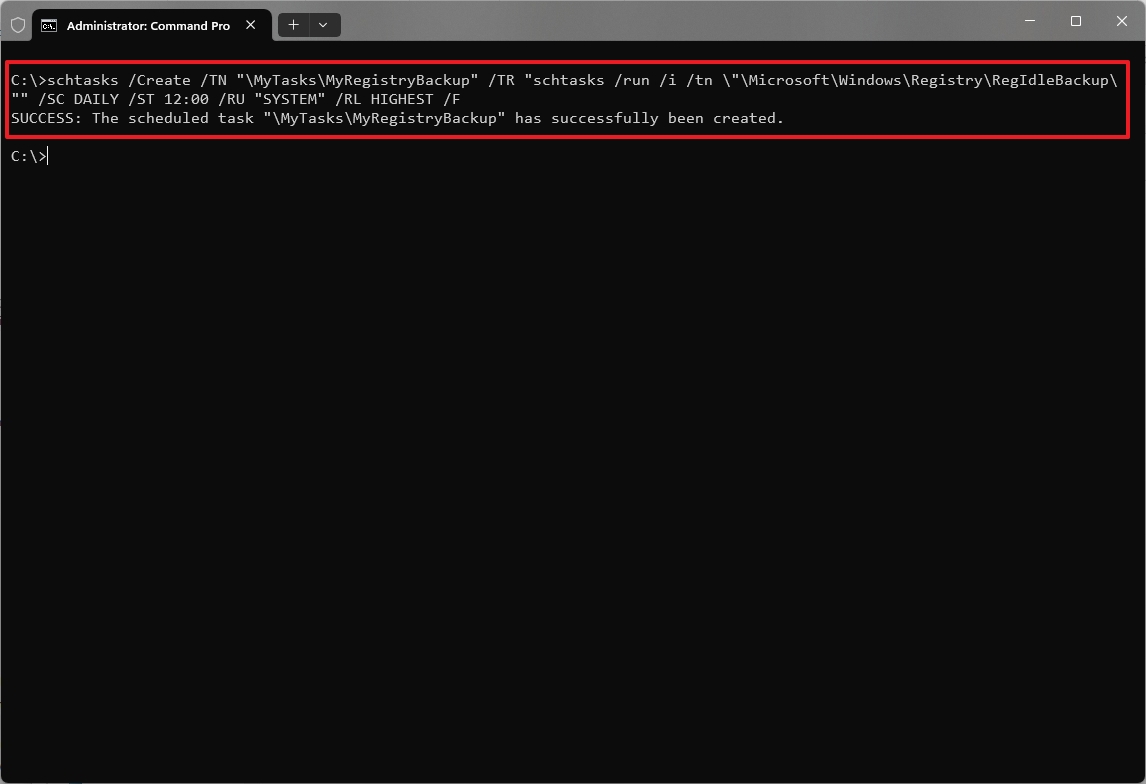
After you complete the steps, Windows 11 will create a backup of the Registry when you schedule the task.
The above command will create a new « MyTasks » folder and will make a « MyRegistryBackup » task in Task Scheduler, and it’ll run it daily at 12 PM. You can always update the name, location, and time to suit your preferences.
Although I’m aware that some of the tweaks can be managed through other means, such as the Group Policy Editor, knowing how to change them using the Registry can come in handy when creating a script to make system changes on multiple computers.
Do you know of any other Registry tweaks you always apply on a new setup? Let me know in the comments.
More resources
Explore more in-depth how-to guides, troubleshooting advice, and essential tips to get the most out of Windows 11 and 10. Start browsing here: